Sunday 30 January 2011

Winter's Gray

I haven't marbled in a while, and thought it was time. I first thought I would just marble in a color theme, but when colors weren't cooperating, I went a different route. This manicure is a bit muted and totally fitting for the winter season that always seems it is never ending. Cold, snow, cold, snow and repeat. But even in our monotonous routine, there are pretty things to be found!

Right Hand:


Left Hand:


I first painted a base with two coats of China Glaze White on White. Then I marbled with Light As Air, Awaken, Swing Baby and OPI Brand New Skates. I sealed the marble with two coats of Seche Vite.

Thursday 27 January 2011

Camelot Blossom with Konad

Hi,
Here's my new manicure using Konad image plate m78.
I stamped the image with Konad special Black. Here's what I got:


The base color I used is from Nubar and it's called Camelot Blossom.
Here's a closer look (two coats):


What do you think?

Sparkle Web

I owe a manicure in this color as I got it as a gift from a friend. And that's about all the description I have! I might be boring, but I don't think this manicure is...


I painted three coats in China Glaze Go Crazy Red. I used Konad image disk m64 with Konad's Special Nail Polish in Black then filled in random areas with China Glaze Mrs. Claus and I used two coats of Seche Vite to finish the look.

Wednesday 26 January 2011

Konad goodies

Hi,
Here's what I recently got from Konad

Image plates m34, m63, m71, m78 and m76.
I also got 2 small special polishes, blue and white.

If you are from Romania, you can buy Konad products from Konad Nail Romania.

Do you own this plates?
Which one is your favourite?

Tuesday 25 January 2011

Review: S-Nail Nail Foils

I was lucky enough to receive two sets of S-Nail nail foils from my favorite Konad supplier OC Nail Art. Pleas note that these foils are not on sale at their site. They gave me and other people the chance to try them out in order to see if they should carry them in their online store. I have yet to find a way to purchase them anywhere else, but if I find that out, I will let you know....

I am going to give a quick rundown of the application process, show you pics of before, during and after and finally my thoughts about the products. I first applied the pink foils (there is no name or design number) and the second time trying the foils was with the silver and black Zebra print.

This is a photo of the instructions that came on the package (click to enlarge):

Here is my interpretation/follow through with their directions. I found that the tools needed for this manicure (imperative in my mind) were a manicure scissors, a rubber smoothing tool and cuticle trimmer (I have a combined tool click here) and a hair dryer or heating tool.

Step 1: I shaped and filed my nails, washed my hands and then cleaned them one last time with rubbing alcohol to get all residue off of my nails.

Step 2: Pick size. There were 16 foils, 8 various sizes. For the most part I was able to find a size that covered my nail, but in nearly all cases I had to trim because they were too large.

Step 3: Peel sticker and apply. Application was alright and I would agree that it worked better when I started on one edge and smoothed to the other. But it sometimes took trial and error (and me having to try to re-stick) if I had too much nail peeking through.

Step 4: Smooth the sticker on the nail. I did have bubbles on several of the foils or what I would call gathering where the sticker stuck to itself on the tip of my nail. I was able to smooth all bubbles out with a rubber-ended tool. On nearly all the nails I had to trim excess foil from some part of my cuticle. I trimmed as much as I could from my nail bed and cuticle area before I applied heat. Speaking of heat, there wasn't any guidance of what "heat will needed" implied, but I used a hairdryer on a medium setting. After heating, I went back and smoothed the foil and especially on the second foil application, concentrated on the edges of my nail.

Step 5: Trim excess. I used a cuticle trimmer and a small scissors to trim foil down to my actual nail. I found this to be the hardest step of the whole process--especially when needing to trim with my non-dominant hand. The difficulty was getting a smooth trim that didn't have any edges that would catch on things while doing daily tasks. Also, when reading the instructions I was confused by the note "When trim the excess, it will lift at the free edge if the top later is filed off". My interpretation of this was "don't file the excess or you'll have lifting". But I can't be sure because there was no website that I could consult with.
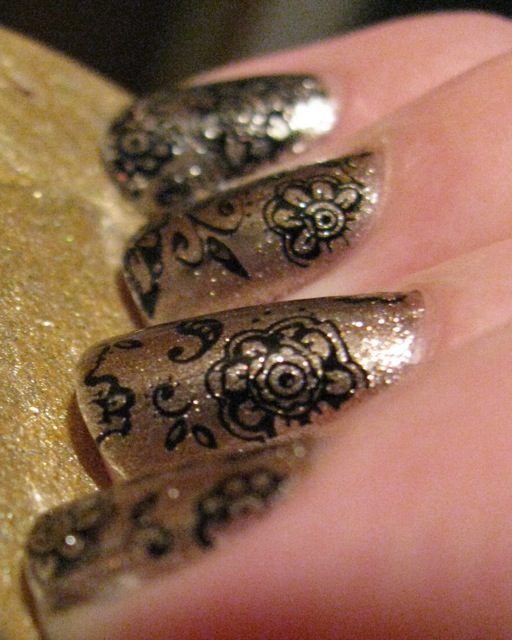
Final Looks:


The Trouble With Foils: Polish chips, but foils lift. According to package, these foils can last for up to 9 days. This first picture is the lifting I experienced after only wearing them for 5 hours (and just out on the town--no heavy lifting, dish washing, nail-heavy activities). I had full lifting on the sides by 24 hours (as seen in second picture). I only wore the pink foils Friday night to Sunday early evening. I could have trimmed the lifting and kept them on longer, but I couldn't stand the imperfections, and they truly did catch on things throughout the day and it really bothered me. I started to feel paranoid, so they came off. The silver foils I applied on Thursday evening and took them off Sunday night (but all Sunday I wanted them off, I only had time to do my nails Sunday night).


Final Review: The best part about this product is in achieving a look that you would never be able to get with polish. The metallic shine that these foils had was eye-catching and fun. People noticed my nails and it was fun. For me, their uniqueness would be the draw to purchasing foils in the future. However, I was led to believe that they would last for 9 days (OC Nail Art had much better luck) and they didn't. On a side note, I really am wondering about climate. I live in MN and it is cold here and when I wore these foils it was during some of our most cold days of the winter season (negative temps) and I am curious what effect that might have on lasting. I wish I had more to try in the summer for a comparison. I also feel a draw of foils is in their ease of application, i.e. no polish drying time and immediate gratification once done. But for me, completing this manicure took me at least and hour for the first application. Actually the second time I put the foils on, I took nearly two hours just trying to ensure using effective heating of the foils, smoothing and trimming. (Not that it should have taken two hours, I just kept getting paranoid about not have trimmed well enough or heated well enough or smoothing the foils well enough.) I really wanted this manicure to last! Since I was avoiding filing the foils (like I have been instructed to do with other nail applications), I didn't feel I could ever get a perfect tip with these foils.

Bottom Line: I don't know how much these foils will retail for, and I have to say that price point may be a major deciding factor in trying these again. I would say that for a special event, these would be a great manicure idea, but ultimately I didn't find them easy or durable. I found them exciting, but irritating and I'm glad I got to try them, but was appreciative they were free.

Something extra: I'm such a hoarder of special nail art ideas that I have saved all the scraps for these foils to use again. I posted about it here and you may see these foils pop up again in the future!


Purple Lace

I know I have been behind in posting. Rest assured, my nails have been polished ;) I just have been either busy or lazy. And this weekend I was totally caught up in baby birthdays and book reading. So I'm going to catch you up with the manicure that is currently on my hands. I'm patiently waiting for my three free Zoya polishes to come in the mail and I'm hoping that by wearing a color it will speed up this process.


I coated with three coats of Zoya Mimi and used Konad image disc m69 with China Glaze Millennium to create the lace look. I coated once with Seche Vite.

Saturday 22 January 2011

Dotted golden lilac manicure

Hi
Here's my new manicure.
I applied two coats of Zoya Malia and then I applied a coat of SuperStar SoHo Chic
on half of each nail.
After it dryed, I made the dots using the dotting pens from Born Pretty store.
Here's what I got:

What do you think?
Thanks for reading.

Tuesday 18 January 2011

Born Pretty promotional code

Hi,
I have a promotional code for you in Born Pretty online store.
Anyone who uses the coupon code BP299 can get free a
Hello Kitty Image Plate with their order.
You can check my reviews for their products or you can go to their website.

Have a nice day!


Monday 17 January 2011

Reduce, Reuse, Recycle

I recently received samples of nail foils from OC Nail Art to try out and review. I got two sets and tried the first this weekend, but I'm not going to fully review them until I have made a second attempt with my final pack of foils. However, this manicure is a little teaser of the nail foils I already tried out. When it comes to nail art, decals and decorations (rhinestones and such), I try to be as frugal as possible. I save used gemstones to use again. I have saved fimo decals and such. In this design, I used left over foils to add to my manicure. In each foil pack you are given various sizes of decals that end up needing to be trimmed and some sized you won't use at all because there are 16 foils in a pack and I only have 10 nails. I decided to save the trimmed foil as well as the unused full nail foils and repupose them for a manicure. I think it was a great way to recycle a great gift and get a design that would be hard to achieve with just regular polish.


I first coated three coats of China Glaze Frostbite. I then trimmed squares of S-Nail Nail Foils. Unfortunately there is no direct website for S-Nail. If OC Nail Art decides to carry the line after the reviews from other nail artists, I might be able to get you a website for you to check out. I did one coat of Seche Vite over Frostbite before adding the decals and then one coat over the entire manicure again (however I do find that the clear polish does peel off of the decals and the final coat over the decals may be unnecessary).

Sunday 16 January 2011

Pink dots (Valentine's Day manicure idea)

Hi,
Here's my new manicure done over Flormar M103 white.
I used 3 different pink polishes and a red one to make the big dots.
Here's what I got:


And here are the dotting pens used:
I got them from a nail art store called Born Pretty.
This set costs $4.30 and they ship internationally.

Thursday 13 January 2011

I Heart This Red

I didn't have much time to do a manicure last night and so I wanted to get something on my fingers that was simple, but likable. I haven't gotten around to post until today and after reviewing the pictures I took, I am just not sure they do this red justice. It is so, incredibly pretty. I just kept looking at my nails today and admiring the way that the light makes this polish shine like foil. Very, very pretty!


I painted three coats of Zoya Lisa on eight of my nails and China Glaze Cheers To You on my pointer fingers. I used Konad image disc m59 with Lisa and finished with a new top coat I tried CND Speedey (which I couldn't use on my pointer fingers because it made the image bleed--I don't think it is thick enough, so I used Seche Vite on the silver fingers)

Monday 10 January 2011

Pure and Simple

I'm still trying out my new Konad plates and decided to do something nice and sweet. I haven't featured this polish from China Glaze and it is such a nice, neutral shimmer.


I painted three coats of China Glaze Swing Baby and used Konad Image Disc m64 with Konad Special polish in Black and coated once to finish the manicure with Seche Vite.

Saturday 8 January 2011

Turquoise and gold leopard nails

Hi
I'll show you a new manicure inspired from Polish and Konad.
I painted my nails with 2 coats of Miss Sporty #60.
Then I made a gold stripe in the middle of the nail with Avon Gold lustre.
I stamped the little image from m57 image plate, and then
I applied some dark blue rhinestones.
Here's what I got:

What do you think?

Thursday 6 January 2011

Poison Control

I got a great gift certificate to OC Nail Art from my brother for Christmas to increase my Konad supply and am excited to try out my haul. I have only ever bought one "special nail polish" for Konad stamping before; it's blue and I rarely use it. However, I thought it was time to invest in black and white so I could really get some opaque stampings in those shades. I have to say, it really paid off. These images are so clean and crisp--especially the white on black. I have had great luck with OC Nail Art for Konad--it's located in the US. I ordered Monday and got my plates and polishes today in the mail! If you get the chance, check out their website!


Look how clean and clear!

I painted the black nails with three coats of Sally Hansen Complete Salon Manicure in Midnight In NY, the white nails are three coats China Glaze White on White and one coat of Orly Winter Wonderland. I used Konad Plate m28 and special polishes in White and Black and Zoya Lisa for my thumbs. I used two coats of Seche Vite on top.

Princess [Drag Queen?]

I was with a seven-year-old and when I asked what I should paint on my nails next, she said "A Princess!" So I thought I could handle one quick, two-fingered princess (which was also in the request) and some Bundle Monster fauxnad for the rest of the design. I think the princess has a little too much "makeup" on and her lips are quite big, which is why I nicknamed her Princess Drag Queen....


I first painted three coats of China Glaze Light As Air. For the Princess face (and body) I mixed China Glaze Ingrid and Ulta Angel Baby, China Glaze Liquid Leather for black detail, Evening Seduction for the hair, Entourage for her eyes, Orly Glitz & Glamour for the crown and hair highlights, Zoya Lisa for the mouth. For her dress I painted Zoya Charla, Orly Winter Wonderland and Luxe for the gold detail. I used Bundle Monster plates BM14, BM21 and BM08 for the designs with colors in Zoya Charla and Yasmeen, China Glaze Flip Flop Fantasy and Sun Worshiper and Orly Luxe

Golden Stripe

Ok, so the title isn't that exciting, but I am posting a manicure that is no longer on my nails in order to get it to you, so I'm not using all of my creative juices. Getting into the swing of things here in the new year has been hard. So this is gonna be quick so I can get down to the business of catching you up!


I painted three coats of Zoya Crystal and used Konad plate m57 with Orly Luxe. I then filled in with a fine brush and Luxe the gold stripe and added some glitter with LA Splash Cosmetics and Golden Egg. I used one coat of Seche Vite to finish with the shine!

Nubar nail polishes

Hi,
Today I'll show you my first Nubars. I won a prize on Renate's blog
that included this polishes.

This is 2 coats of Belize Coral

After, I applied a coat of Pink Glitter

Here's the rest of the prize

I like them so much! The colors are very pretty.
I didn't have to wait for too long to dry and it was easy to apply.
They have really nice brushes and a large variery of pretty colors.

What do you think about them?

Tuesday 4 January 2011

Crackling nail polish

Hi,
Today I'll show you a crackling nail polish called Kelier.
You can buy it from an online nail art store, called Born Pretty.
You can find get this for $4 and there are four different colors.
Here you can find out more about them.

Here I have the black crackling polish and this is how it looks like:

Do you like crackling nail polishes?
What do you think of this?

Piggy Paint promotional code

Hi,
I have a promotional code to share with you.
You can save 15% with code splash15l at Piggy Paint store.
Code expires December 31, 2011.

If you are from Canada you get free shipping if you spend over $35.
They also ship internationally.
Read more about their non-toxic nail polishes here.
Also, check my review.

Sunday 2 January 2011

Valentine's Giveaway

[THIS GIVEAWAY IS NOW CLOSED]

Hi,
I have a new giveaway for you! Actually, it's a nail art contest.
To be entered in this giveaway you have to make a manicure
with Valentine's day theme and then send it at konadaddict@yahoo.com
Please leave me a comment on this post when you send your entry.

Rules:
Be a follower. Do not forget to mention the name which you are following under and if you have a blog, or it you don't, your country.
This giveaway is opened to international followers, too.
The manicure shouldn't be posted on any blog before the voting will start.
Voting will be opened for all my followers.
You may post about this giveaway on your blog, but it will be a random act of kindness (sorry, but you don't get extra entries for doing that this time).
Send me your entries before January 30th February 6th.

The prize:
Any 8 image plates from Chez Delaney on your choise!

Good luck, girls!
Many thanks to Chez Delaney for sponsoring this giveaway!

Piggy Paint giveaway winner

Hi!
My Piggy Paint giveaway is now closed.
There were 35 entries and the lucky number was 23.
The girl who won the $15 gift certificate is.....


GabZ1985 !!!!

Congrats girl!
I'm emailing you right now!

Don't be sad if you didn't win. A new giveaway will start tomorrow!