Showing posts with label freehand. Show all posts

Sunday, 23 December 2012

Santa's suit nail art

Hi,
Today I'll show a new Christmas manicure I created: Santa's suit. I started with two coats
of Astor -060 Iconic Red and then, I applied a coat of Illamasqua -Scorch in the middle of 
each nail. Using dotting tools and thin brushes, I added the belt and buttons details. I finished
with a clear top coat. What do you think? What manicure are you going to wear for Christmas?


Here's another manicure I did for a friend of mine. Which one do you like the most?

Monday, 17 December 2012

Reindeer nail art

Hi,
Today I'll show you my new Christmas themed nail art: reindeer. I'm so excited about this, 
as I've never done something similar and I think the final result was a pretty good one. For 
this design, I only used Illamasqua nail polishes. I started with two coats of Scorch, and 
then, using a thin brush, I applied Taint to create the reindeer's head. Using dotting tools, 
I created the eyes and the nose and then outlined the the design using Scorn. I took my 
thin brush again and created the horns. For the red nose I used Alarm nail varnish. I 
finished with a clear top coat. What do you think?


And now, I want to show you my Christmas themed cake, too. Enjoy!

Saturday, 15 December 2012

Christmas lights nail art

Hi,
Today I'll show you my holiday lights manicure.My inspiration for this was 
Pushing Polish. I started with a base coat and then, using a sponge, I applied
white nail polish on the tips of the nails. Then, I created a black curved line
on each nail, using a thin brush. I randomly applied colourful rhinestones and
finished with a clear top coat. What do you think?

Friday, 7 December 2012

Candy canes -Christmas manicure

Hi,
Today I'll show you another Christmas themed nail art: Candy canes swirls. For this 
manicure, I firstly applied two coats of Illamasqua -Scorch (about  which I wrote a 
review here) and then I started creating the swirls using thin brushes.The nail polishes 
used were Illamasqua -Allarm (red), Oriflame -Silver lining and Sinful Colors -Last 
Chance (green). I finished with a clear top coat and then went outside to take some
 pictures in the snow! The lightning wasn't exactly the best possible, but I hope 
you'll like what you'll see. What do you think about it?

Tuesday, 27 November 2012

How to create balloons on nails in 3 easy steps

Hi,
Today I'll show you my colourful balloon nail art which I very easily created.
If you like this manicure, keep reading for the tutorial.

Step 1 
Paint all your nails a white base colour. For this, I used Illamasqua -Scorch. After 
they have dried, apply french manicure tips on all of your nails, exactly the way I did. 

Step 2 
Chose different nail polish colours to paint the part above the tape. Wait until 
they have dried. The nail polishes I used (from left to right): Illamasqua -Faux pas, 
Astor #070, Illamasqua -Radium and Sinful Colors -Timbleberry. 

Step 3 
Remove the tape and create a thin line under each balloon with the colour
you used for that nail. Also, paint a grey or black wavy line. Use a nail art brush for this. 
Finish with a clear top coat. The nail polish I used for creating the line is called Zoya -Kelly.

What do you think? Are you going to try them?

Wednesday, 17 October 2012

Go Pink Wednesday -Pink zebra nails

Hi,
Today I'll show you my white and pink animal print nail art for this Wednesday.
I started with a coat of Born Pretty -Matt Dull White and then, using a sponge, I
made some pink lines either on the middle of the nails, or on their extremities. For this 
step I used Sinful Colors -Cream Pink. Then, using Stripe Rite -Black, I created 
the zebra print. I did this freehand. In order that I got the lines thicker at the margin
and thinner at the center, I had to apply more pressure on the brush when I painted
 the margin and less and less pressure as I went to the center. I finished with a
clear top coat. What do you think?


Saturday, 18 August 2012

Love nails

Hi,
Today I'll show you a very easy to do freehand nail art.
I painted all my nails with two coats of Essie -Topless&Barefoot and then I took a thin
brush and Illamasqua -Taint in order to create the four letters on my left hand. I firstly 
practiced on a piece of paper and then I created the design on my nails. I applied a coat 
of Essence -Circus Confetti on my thumb and right hand's nails and finished with a
clear top coat. What do you think?


Thursday, 9 August 2012

City skyline manicure

Hi,
Today I'll show you a manicure I saw on cutepolish' channel.
I started with two coats of Zoya -Malia and then I applied Miss Sporty #330 on the top 
of my nails using a sponge. I used Illamasqua -Scorn for the buildings and I created 
the lights using a dotting tool and Golden Rose #04. I finished with a clear top coat.
I invite you to watch this video for the technique. 
What do you think?


Thursday, 31 May 2012

Half moon nails

Hi,
Today I'll show you an astral manicure. I started with two coats of
Catrice -It blue my mind and then, using a french manicure tape, I created
the half moon using Stripe Rite -Yellow nail polish. Then I applied some
silver star-rhinestones on my ring finger. I finished with a clear top coat.
What do you think?

Don't forget to visit It's so Easy Nails' website for more interesting manicure ideas.


Saturday, 3 March 2012

Tuxedo nail art

Hi,
As many of you might now, tuxedo nail art has became a trend since they 
were worn on the red carped, so I decided to come up with a similar design.
I started with two coats of Essie- Topless&Barefoot. After that, using a 
thin brush, I created diagonally two black lines and filled them in with
Illamasqua- Scorn. Then I created the bows and two small dots on each
nail with a dotting tool. I finished with a clear top coat. 
What do you think?

Sunday, 5 February 2012

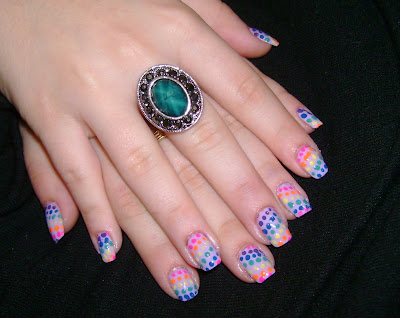
Colorful dotted manicure

Hi,
Today I'll show you a colored manicure I did using dotting tools.
I started with two coats of Essie -Nice is nice and then I applied one by one 
the dots using different colors. I finished with a clear top coat.
What do you think?

(not my nails in the picture)