Showing posts with label illamasqua. Show all posts

Wednesday, 26 December 2012

Presents nail art

Hi,
Today I'll show you my last Christmas themed manicure this year. As presents are being offered at this time,  I decided to wrap my nails, too. I started with two coats of Illamasqua -Kink and then, using a gold nail polish, I stamped the design from m65 Konad plate. After that, I took a thin brush and created two red lines on each nail. The nail polishes used were Illamasqua -Alarm and Astor -060 Iconic Red. Finally, I applied the Konad -Special Top Coat. What do you think?


 A halogen light lamp was waiting under my Christmas tree, so I finally made my first highlight box. I followed Chalkboard Nails' very easy tutorial and I managed to to this. Hopefully, the quality of my pictures will improve from now on. 

Sunday, 23 December 2012

Santa's suit nail art

Hi,
Today I'll show a new Christmas manicure I created: Santa's suit. I started with two coats
of Astor -060 Iconic Red and then, I applied a coat of Illamasqua -Scorch in the middle of 
each nail. Using dotting tools and thin brushes, I added the belt and buttons details. I finished
with a clear top coat. What do you think? What manicure are you going to wear for Christmas?


Here's another manicure I did for a friend of mine. Which one do you like the most?

Monday, 17 December 2012

Reindeer nail art

Hi,
Today I'll show you my new Christmas themed nail art: reindeer. I'm so excited about this, 
as I've never done something similar and I think the final result was a pretty good one. For 
this design, I only used Illamasqua nail polishes. I started with two coats of Scorch, and 
then, using a thin brush, I applied Taint to create the reindeer's head. Using dotting tools, 
I created the eyes and the nose and then outlined the the design using Scorn. I took my 
thin brush again and created the horns. For the red nose I used Alarm nail varnish. I 
finished with a clear top coat. What do you think?


And now, I want to show you my Christmas themed cake, too. Enjoy!

Thursday, 13 December 2012

Christmas nail art

Hi,
Today I'll show you another Christmas nail art I created. I started with
two coats of Illamasqua -Scorch on all nails except my thumb and ring finger,
where I applied Sinful Colors -Ruby Ruby. The image plates used for each 
finger are, from left to right: m12, m59, m14 Konad plates and an Essence
plate for my pinkie. I used Illamasqua -Allarm for the designs stamped with
red and Konad Special White. I finished with a clear top coat.
What do you think?

Friday, 7 December 2012

Candy canes -Christmas manicure

Hi,
Today I'll show you another Christmas themed nail art: Candy canes swirls. For this 
manicure, I firstly applied two coats of Illamasqua -Scorch (about  which I wrote a 
review here) and then I started creating the swirls using thin brushes.The nail polishes 
used were Illamasqua -Allarm (red), Oriflame -Silver lining and Sinful Colors -Last 
Chance (green). I finished with a clear top coat and then went outside to take some
 pictures in the snow! The lightning wasn't exactly the best possible, but I hope 
you'll like what you'll see. What do you think about it?

Saturday, 1 December 2012

Sinful Colors -Frenzy

Hi,
Today I'll show you glittery manicure I very easily created using two different nail 
polishes. I started with two coats of Illamasqua -Scorn and then I applied 2 layers 
of Sinful Colors -Frenzy. As simple as that. The final result is very effective and the 
glitter looks awesome no matter what the lightning is. Click on the pictures 
to zoom. What do you think?

I also created a special effect for this picture and posted it on my Facebook
page. You can see it here. Tell me whether you like it or not.

Tuesday, 27 November 2012

How to create balloons on nails in 3 easy steps

Hi,
Today I'll show you my colourful balloon nail art which I very easily created.
If you like this manicure, keep reading for the tutorial.

Step 1 
Paint all your nails a white base colour. For this, I used Illamasqua -Scorch. After 
they have dried, apply french manicure tips on all of your nails, exactly the way I did. 

Step 2 
Chose different nail polish colours to paint the part above the tape. Wait until 
they have dried. The nail polishes I used (from left to right): Illamasqua -Faux pas, 
Astor #070, Illamasqua -Radium and Sinful Colors -Timbleberry. 

Step 3 
Remove the tape and create a thin line under each balloon with the colour
you used for that nail. Also, paint a grey or black wavy line. Use a nail art brush for this. 
Finish with a clear top coat. The nail polish I used for creating the line is called Zoya -Kelly.

What do you think? Are you going to try them?

Tuesday, 20 November 2012

Illamasqua -Nomad and marble manicure

Hi,
Today I'll show you another shade from Illamasqua, called Nomad. It is a beautiful 
apple green shade, which is perfectly opaque after two coats. You can see yourself
the shiny nail polish in the pictures, applied in two coats, without any top coat.

 Here it is the same shade applied  from the quarter of the nail. For this design, I 
made a free hand marble, inspired by this tutorial. I applied a heart shaped rhinestone
on my ring finger and top coated all the nails. What do you think?

You can find Illamasqua products online at Illamasqua.com.

Sunday, 18 November 2012

Home made nail stickers TUTORIAL: Mustache manicure

Hi,
Today I'll show you my first attempt to home made nail stickers. They are very easy to 
do and are very helpful when you want wear designs you can't paint directly on the nails.
As I've tried several times to paint mustaches on my nails and I failed each time, I 
thought this might be the perfect design to stick. Now, into the tutorial:
Tools needed: 
-a plastic bag
-clear nail polish
-one or more coloured nail polishes for the design
-tweezers

Procedure:
1. Put the plastic bag on a still stand, in order that you can easily paint your design.
2. Paint rectangles using clear nail polish and allow them to dry for a few hours. I made 
more then ten, just in case I would spoil some of them when peeling them off.
3. After they have completely dried, paint the desired image on the rectangles. Use
any thin brushes, dotting tools, toothpicks you have to create a beautiful design to stick
on the nails.
4. Gently peel the strips off the plastic bag using tweezers.
5. Apply a base colour on each nail, and while it is still wet, stick the design. 
6. Remove the excess strip using scissors, nail clippers of a nail file.
7. Use top coat to protect your manicure.


For the base colour, I used two coats of Illamasqua -Scorch and then I applied a
coat of Deborah Lippmann -Boom Boom Pow. This is the final result. 
What do you think? Have you ever created your own home made stickers?

Thursday, 15 November 2012

Illamasqua -Scorch and houndstooth nail art

Hi,
Today I'll show you a nail polish form Illamasqua, named Scorch. It's a beautiful snow white, with a perfect coverage and texture. I for one find it very difficult to find a good white nail polish, as they are either too thin, with a very poor coverage or to thick and hard to apply. This one is in the middle - it doesn't have any of this problems. The coverage was perfect after the second layer and its brush made it very easy to be painted. This is how it looks like without any clear top coat. You can find it on their website, for £13.50. Also, Illamasqua offers a wide range of many other make-up products which they ship internationally.


I stamped over it a houndstooth design from m63 Konad plate on all my nails, except from my ring finger, where I applied three silver rhinestones. I finished with the Konad -Special Top Coat. What do you think? 

Sunday, 11 November 2012

Embroidery manicure

Hi,
Today I'll show you a new manicure I made using m57 Konad plate. I started 
with two coats of Illamasqua -Taint and then, using the Konad -Special White,
I stamped the design at the same height on each nail. I finished with the 
Special Top Coat. The result was a very cute, old school embroidery. 
What do you think? 

Tuesday, 30 October 2012

KKcenterhk products & Halloween manicure

Hi,
Today I'll show you the products I received from KKcenterhk and also a Halloween 
manicure I created using on of their image plates. 
There are three different image plates I got- m40 (the equivalent for m22 Konad palte), 
B115 and B23 (the equivalent for m33 Konad palte) - and also a stamper and a scrapper. 
The designs work perfectly well for stamping and the price of each image plate is $5.05.
They carry a wide range of products which they ship internationally. 

I created my manicure using B115 image plate. I painted my nails two coats of Illamasqua 
-Gamma except my ring finger, on which I applied Illamasqua -Faux Pas. After stamping 
the designs, I applied a clear top coat. What do you think?
 

Saturday, 13 October 2012

Sprayed nails TUTORIAL (Autumn Design)

Hi,
Today I'll show you a new technique for an original, cute manicure. 
1. Paint your nails two coats of any nail polish you like. I used Glitter Gal -Skater Girl Green. 
You can see its swatch here
2. Take a perfume sample bottle that has an atomizer and one or two different nail polishes 
to spray over the base colour. 
3. Poor the nail polish in the perfume sample bottle so as to fill about a quarter of it.
4. Apply some scotch tape on your cuticles for protection.
5. Spray the nail polish on the nails. 
6*. If you want to spray another colour, poor a small quantity of acetone in the perfume 
sample bottle and clean it using an ear stick. Repeat steps 3-5. 
The nail polishes I used for spraying are Sinful Colors -Rich in heart and Illamasqua -Gamma.
7. After it is all done, apply a clear top coat to protect your design and add a beautiful shine.
What do you think? Are you going to try it?

Friday, 28 September 2012

Mauve zebra print

Hi,
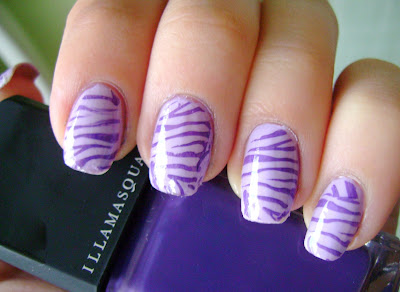
Today I'll show you my mauve zebra manicure I made with Konad m57 image plate.
I started with two coats of Essie -Nice is Nice and then I stamped the design using
Illamasqua -Faux. I finished with a clear top coat. What do you think?

Wednesday, 5 September 2012

Striped manicure

Hi,
Today I'll show you a manicure I created using striping tape.
I started with two coats of Astor -Fashion Studio #070 and then I cut 3 small pieces of tape 
for each nail. I stuck them diagonally and then, using a sponge, I applied Illamasqua -Nomad
and Golden Rose #04 on the tips. I finished with a clear top coat. This is the final result.
What do you think?

Saturday, 1 September 2012

Holographic animal print

Hi,
Today I'll show you a cute manicure I created using m78 Konad plate.
I usually don't like this design stamped over a single and simple base colour, so I
alternated two nail polishes, Illamasqua -Gamma and Astor -Iconic Red. I also applied 
a very thin coat of Stripe Rite -Silver Holographic above and then stamped the animal 
print design. I finished with the Konad -Special Top Coat. 
What do you think?


Thursday, 23 August 2012

Wild animal print manicure


Hi,
Today I'll show you a gradient animal print manicure which the girl from
 LuvMyLacquer inspired me to do. I painted my nails a coat of Illamasqua -Gamma
and Illamasqua -Radium alternatively. Then, using a sponge, I created the gradient effect
using the technique shown in the picture below. The polishes I used for the gradient
were Astor -060 Iconic Red and Sinful Colors -Happy Ending. Then I stamped
the leopard design on the green nails and the zebra design on the orange nails. Both
designs are from Konad m57 image plate. I finished with the Konad -Special Top Coat.
What do you think?